Pages

Sunday, May 2, 2010

New Layouts

Since I moved in early December, I have not made a single layout. That is until Friday. And now I'm on a roll! I finished my Happiness album and have moved onto my Life album. Here are the four layouts I've done:


It's amazing how much my style has changed since my last LO:


By the way, that layout won me a contest :)

Other than that I am just waiting on my new boss at my new job to call me...just waiting...

Saturday, May 1, 2010

Altered Graphic 45 Jumbo Clothes Pin & New Job!

First off, a shout out to Jules over at The Jule Box for the amazing kit she sold me this last week. WOW! I was so excited to get it. Here is how I altered the jumbo 9" clothespin:


The back side of the Art Nouveau - Hey You! - paper covers this side of the pin.
I added bling from the kit and used a ribbon rose made by my talented friend Kima.


I used an image from A Proper Gentleman (from Graphic 45's collection) sheet of paper here. Then I glimmer misted the kit's white Primas with Brick and Scarlet. I added the pebble for the center and finished it off with the kit's key charm.


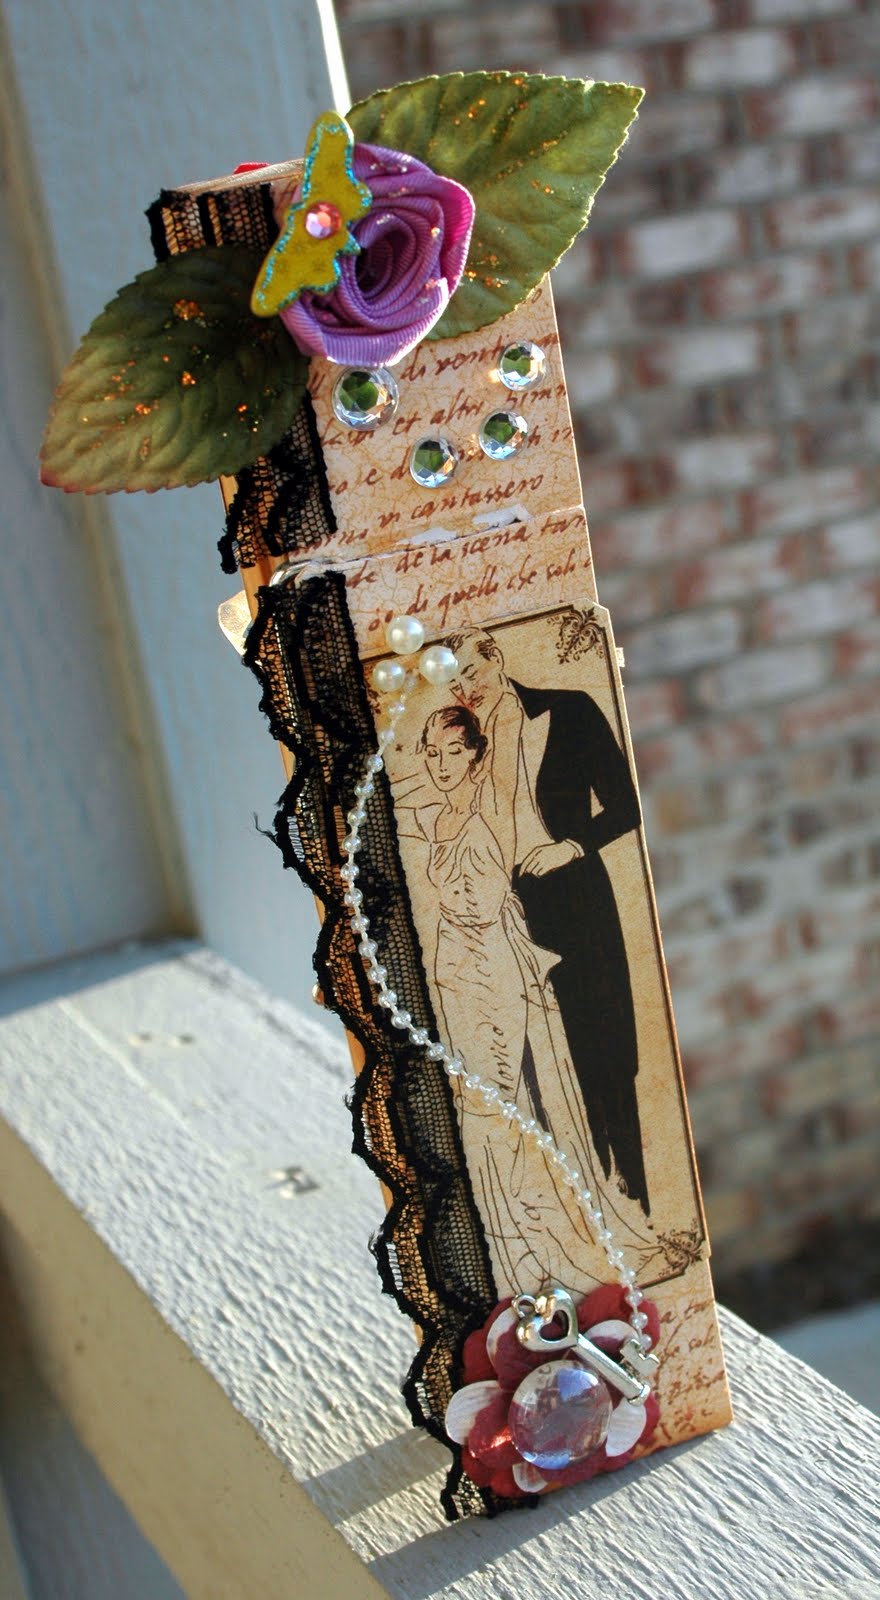
Art Nouveau - Hey You! - Collection from Graphic 45 and A Proper Gentleman Collection from Graphic 45. A string of pearls adorns this side of the pin, flowing from a cluster of flowers, pebbles and charms. Black lace trims the left side.


I covered the inside of the pin with the vintage music sheet, and the other side is covered with ripped French novel paper.


This booklet opens up to reveal space for pictures. I made the top flower and stacked it on a Daisy Doodle Prima flower. I used Jules' idea of cutting the paper line's name and using it as the book's name :)


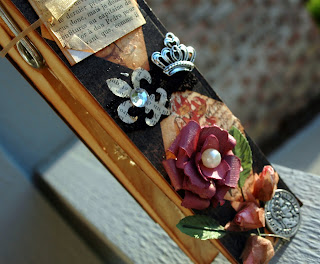
Handmade rose by me centered with a pearl from Jules. Three rosebuds glimmer misted with Pashmina. Vintage metal button from Jules, a fleur de lis punch out from Jules with her bling, and a crown charm in the kit.


The front side of the pin covered with the decorative side of the Art Nouveau - Hey You! - paper from Graphic 45.


Awesome kit, Jules, thank you for the inspiration!

On a personal note, I quit my job Thursday night. I felt God pulling me away, and I hated the job to begin with. Never liked a second of it. So I listened to God and left. I applied to Subway, where I worked last year in South Bend, IN (home of Notre Dame) and thought it was a pretty awful job...but that was until I found work at Life Time Fitness. Looking back, it was an easy job with a little bit of stress during rushes. Nothing compared to the hell I endured at LTF. Anywho, I applied on Friday afternoon, and 24 hours later I am employed with them again!

I am going on a scrapbook retreat with my friends from scrapbook.com in June to Montana, so a job is crucial for my financial situation. God is so good! I don't always say it so enthusiastically, but right now things are good so I praise God for this opportunity. Thank you, Lord, for not letting me down. You never really do.

Saturday, April 17, 2010

Deux Shabby Chic Album for Jade

Whew, I haven't posted in awhile! But I'm still here ;)

I've made plenty of minis since my last post but there are way too many to share...so I'll pick my favorite. It's one I made for Jade over at JadedStudios for Deux Shabby Chic. I had to drop out of the kit club due to some money issues but I used their February kit along with my pal Maricella's kit to make Jade's mini. I also followed a tutorial from Laura on YouTube (www.youtube.com/followingthepapertrail). Here's the YouTube video of this mini if you want a better look at it:


Alrighty, on to the pics!


I used book covers from 7Gypsies as the front and back.


As you can see it is SUPER chunky!


Saturday, January 30, 2010

Announcements!

Have I mentioned how much I love journaling tags? I'm obsessed! I'm hosting a swap on scrapbook.com right now just for them. I'll share mine once I finish them ;)

On another note, I am one of the newest members of Deux Shabby Chic (click here to visit them!) I am so excited to be a part of such a talented group of ladies!

And I would also like to mention a kit club my friends I founded over at http://simplyglamorouskitclub.blogspot.com. I will be designing for April's kit, so head on over and check us out!

Monday, January 18, 2010

Chunky Mini Album for Pam

I just got back from my favorite place, Michael's! There's apparently a gas leak somewhere because there were about a dozen fire trucks and police cars barricading part of the road, and I smelled gas. Anyway, I raided their dollar bins for goodies for me and my friends' monthly kit club. Check us out at http://simplyglamorouskitclub.blogspot.com! We are full for February but the list of members can change each term :)

I want to share another mini album with you. This one is for my friend Pam. I haven't done a video yet, but be assured there will be one! I used cardboard as the base for all the pages. It made the album VERY chunky!

I used cardboard for this album. For the cover I ripped off the top layer and revealed the corrugated texture underneath. Then I heat embossed the raised areas and inked the depressed areas. I added glossy accents to all of it to keep it from being so rough. Additionally I added a black corner with glossy accents, four sticky tiles, a "Blessings" sentiment, a Prima flower, and a strand of mini pearls.


The left page: I cut a piece of transparency paper and glued it down on three edges. I covered the glued areas with black paper and added one of my paper flowers. I covered it in glossy accents to make it a bit different. Then I inserted two tags I bought on Etsy.
The right page: I used my Cricut to cut out a top note shape. I ran it through my Cuttlebug with the argyle embossing folder and inked the edges. I accented the raised areas with a black marker. Then I embossed three fleur de lis on the right. I distressed three flowers and added green pearl and gemstone brads.


The left page: I created a pocket with a sheet of tattoo-inspired paper and heat embossed a flourish on the top left. I lined the pocket with black lace and inserted two adorable tags I bought on Etsy.
The right page: The pocket holds one tag and has room for another tag behind it. I used a cross charm on the pocket.


The left page: I again used my Cricut to cut out a top note shape from vintage newspaper that I bought from my pal Miriam. I created the flower on my Cricut with Sure Cuts A Lot. It acts as a holder for the tag that I coated in Glimmer Mist.
The right page: This is an envelope mini :)


The back of the envelope mini and a waterfall card page.


The left page: This is an acrylic frame I painted black and sprayed with Iridescent Gold glimmer mist. I made another paper flower for the corner.
The right page: Simple photo mat with a ribbon flower.


The left page: Pam said she's been into circles lately, so I incorporated them here. The circles fan out.
The right page: Another simple photo mat. The brads hold the hinge in place and will be covered up by a photo.

Thanks for stopping by, and don't hesitate to comment :)


Saturday, January 16, 2010

Joakima's Chunky Mini a la Mariposa

My friend Melody is hosting a quick chunky mini album swap, and I'm partnered with my dear pal Joakima! So I made her mini using the coveted Mariposa stack from Die Cuts With a View. First, here's a video:


And now for the pictures! I had to download Picasa's free editing software since all mine is on my waterlogged laptop. It's pretty good for freeware!


A big Prima flower I got on clearance at Michael's, and a Prima purple gossamer butterfly. Kima loves butterflies, so I had to incorporate them! I kept the album closed with a Tim Holtz grunge board hinge and velcro.


For the left side I used a piece of overhead projector transparency paper for the pocket. The butterfly will hold a picture or a tag. On the right, I used lace from my friend Debbie, and I cut out a birdcage from the Mariposa stack. I love it!


Just a piece of paper and some lace from Deb.


I used an envelope mini (thanks Laura!) to add lots of space for pictures and journaling. There are two double sided photo mats and four tags, plus two one-sided photo mats.


I will post pictures of the accordion pullouts later, I forgot to photograph them! The right page is a double pocket card I made from a YouTube tutorial.


I cut the top note by hand, ran it through the Cuttlebug with the argyle embossing folder, and accented the raised stitches with a black Zig marker. Then I inked the edges. I heat embossed the swirls on the right side of the page.


A waterfall card. I learned how to make this by watching a tutorial from StampFest on YouTube.


I used an altered puzzle piece from my friend Lisa to act as a tag pocket.


You can slide a photo behind the frame.


I bought that flower on Etsy...so pretty!


That's all I have to share for now, thanks for stopping by. Feel free to comment!