Pages

Thursday, April 5, 2012

Etsy or Zibbet?: My Take & Opinion

*This first paragraph explains my nightmarish month of March, scrappy-relevant content is below this first paragraph :)*

Hey scrappers! It's been a bit since I've posted! I was already really bad at remembering to update this blog, but I had a horrible month of March -- It goes like this: tooth causing a lot of pain led to a root canal correction. Still lots of pain afterward, got bite adjusted on the temporary crown. Developed an ulcer on the side of my tongue next to the bum tooth and during the root canal/afterwards I bit a huge chunk of my numb tongue off so that hurt pretty bad for a few weeks. During this I run out of Flonase for my allergies and have to wait for it to get delivered from Germany (much cheaper that way) so I am in utter hell with the tongue ulcer and injury and complete nasal and sinus congestion to the point of tears. I sneezed over 100 times daily, easy and close to one box of Kleenex was used each day for nasal "drainage"...nose and skin below my nose gets painfully raw and red. Then ulcer disappears and the tongue pain stops so I stop prescription painkillers. Bad idea. Should have remembered to taper off. Horrible withdrawal week from Vicodin -- severe depression, absolute insomnia the likes of which I didn't know existed, and stomach troubles. Lots of tears were shed that week and it was nothing short of brutal hell.

Good, that's over with!

So since I last posted I have switched my Etsy store over to Zibbet. The costs of listing and selling are much lower on Zibbet considering I have many different items with various quantities. I was going to stop there, but I want to go ahead and tell you why I am loving Zibbet so much more than Etsy (and if my Etsy graphic thing is still in the sidebar ignore it...you can purchase what is in there but that's not where most of the action is!). I think this might be helpful for anyone interested in selling online and are overwhelmed by the options and where to start.

Let's start with what you get with Etsy since it's so popular and it's what I started with in 2009. Several new features have been implemented since then, and I will include them here:
  • - Free to sign up and create a seller's account (PayPal account required)
  • - List unlimited number of items
  • - Each listed item costs $0.20. If you have multiple quantities of the same item in that listing, you are charged $0.20 for each item -- If you have 5 notebooks for sale, your up-front fee is $1.00. You pay this in a monthly bill whether the item sells or not.
  • - Five photo slots
  • - Keywords and tagging for each item
  • - 10 categories in your store for item types
  • - Ability to re-arrange shop (how it appears to customers)
  • - Coupon and 'Free Shipping' Code Capabilities
  • - Each item listed stays visible to buyers for 4 months. After 4 months it is deactivated. You can reactivate it for the original price you paid to list it initially.
  • - Etsy receives 3.5% of what your item(s) sell for, not including the shipping & handling
  • - PayPal takes a 2.9% fee plus $0.30 for each transaction. For example, if you receive $100 from a sale (including shipping), your fee would be $3.20 ($2.90 + $0.30 = $3.20).
  • - Etsy also lets you accept cash, check, or money order. You choose what to accept. Their newest form of payment is allowing customers to pay with credit cards instead of PayPal.
  • - Shipping Profiles

Now let's get to Zibbet. These are the options/benefits of a free account. For a full list see the graphic below. I am currently under the $9.95/month plan.
  • - Free to sign up
  • - List up to 50 items
  • - Four photo slots
  • - Etsy importer (for listings on Etsy you'd like to transfer to Zibbet). This is free, and I just now noticed it!
  • - Unlimited shop sections
  • - Ok to link to other sites from your Zibbet shop (not allowed on Etsy)
  • - No final value fees
  • - Buyers can pay with PayPal or Credit Card
  • - PayPal takes a 2.9% fee plus $0.30 for each transaction. For example, if you receive $100 from a sale (including shipping), your fee would be $3.20 ($2.90 + $0.30 = $3.20).
  • - Shipping Profiles
  • - Discount/coupon/'free shipping' code Capabilities
  • - Keywords and tagging for each item

If having difficulty reading, see it on Zibbet's site here: Zibbet Membership Comparison


I switched to Zibbet mainly because I was sick of all the Etsy fees. When I decided to start selling supplies, I upgraded so I could list multiple quantities of an item (for instance, 3 bundles of lace). I have found that my sale rate is the same on Zibbet so far as it was on Etsy. Zibbet may not be as big as Etsy right now, but it is a large community gaining momentum and more members every day.

I will post again soon with more updates and scrappy goodness, and I promise to have pretty pictures to show next time! In the meantime, check out my shop, Live. Laugh. Scrap. on Zibbet!

~Katie~


Saturday, January 28, 2012

Notepad/Notebook Cover Tutorial

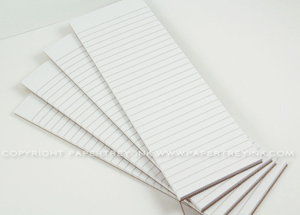
Back in 2010 I came across a great scrapbook website, PapertreyInk.com. While poking around I found these little notepads:

Photo from papertreyink.com | click HERE to view these notepads on their site

These cute notepads are available in white and vintage cream. Now, at the time I hadn't embraced my vintage side, so I ordered a set of the white ones; the vintage ones look lovely and I can't wait to order some. Each set has 10 2.5x8" notepads containing 25 sheets each; I found these nicely priced at $6.

I began working on making covers for these cuties. Here are the four I made with my newfound love, Graphic 45 paper:


I made these for a swap but loved them too much...I decided to list them on Etsy and all but one sold. I came across the last notepad when I moved in October but I sadly have no idea where it is. Ah well, I can and have made more! ;) I ended up creating these notepads for the swap:


The other day I decided to make some more covers so I can list them on my new Etsy site (I moved all my scrappy goodies from Naive Glow Arts to my new shop Live. Laugh. Scrap.). I cannot tell you how fun these are! They don't take long, don't use up a bunch of your stash, and you can get so creative even on a small amount of space. And it's not often we alter/create things in this aspect ratio (12x12 layouts, anyone?), so it stretches your imagination even further. How fun! Here are the two I have made since my return to scrapbooking:

Click here to see this item's listing on Etsy.
Click here to see this item's listing on Zibbet.


Click here to see this item's listing on Etsy.
Click here to see this item's listing on Zibbet.


I realized that I have plenty of notepads of a different size. I stocked up on 3-packs of 5x8" yellow notepads at the Dollar Tree when I anticipated using them in altered file folders for a craft fair. Of course I never did the craft fair so I have at least a dozen altered file folder organizers and a few packs of notepads left over. I figured I would try a cover for one of the 5x8 notepads, and it turned out lovely! I actually stacked two notepads to make it thicker, and that's a great idea for the 25-page mini notepads from Papertrey Ink.

My 5x8" notepad with cover.
Click here to see this notepad's listing on Etsy.
Click here to see this notepad's listing on Zibbet.


I wanted to share how I made the covers and how I decorated them with my YouTube subscribers, so I filmed a simple tutorial giving measurements for the 2.5x8 and 5x8 notepads. Since I tend to get flustered when talking during my videos I wanted to make sure anyone interested in making a cover had easy-to-understand instructions. These are very simple instructions and it didn't take a lot of thought to figure out how to cut and score at what lengths. However sometimes it's nice to have measurements for a project already figured out for you :) Here is the video, and below are the instructions I promised in the video.


For the 2.5x8" notepads:
  • Cut a piece of cardstock or lightweight chipboard to 11x2 5/8"
  • Make your first score line at 8 1/8"
  • Make a second score line at 8 1/4"
  • Bend at the score lines
  • Make sure to leave at least 1-1.5" of chipboard or cardstock above your last score line to adhere to the back of the notepad*
For the 5x8" notepads (2 40-sheet notepads stacked):
  • Cut a piece of cardstock or lightweight chipboard to 11x5 1/8"
  • Make your first score line at 8 1/8"
  • Make a second score line at 8 3/4"
  • Bend at the score lines
  • Make sure to leave at least 1-1.5" of chipboard or cardstock above your last score line to adhere to the back of the notepad*
Customizing the size is very easy, all you need to remember is the following:
  • To figure out the width of your cover, add 1/8" to the width of your notepad
  • Leave the length of the cover at 11 or 12 inches to begin with (depending on the size of your cardstock or chipboard)
  • To figure out the first score line's placement, add 1/8" to the length of your notepad and score at that length
  • Determine the depth of your notepad. That is the distance you need to leave between your first score line and your second.
  • After making your second and final score line, you can trim the length of the cardstock/chipboard to your desired length. Just be sure to leave at least 1-1.5" above the last score line so you can have plenty of cardstock/chipboard to adhere to the back of the notepad*
  • If you are a visual person, these pointers are really easy to understand if you look at one of the PDF templates below.
*Here is what happens if you don't leave much room for the cover to attach to the back of the notepad. Aside from the excess hot glue showing, the problem here is that the cover has the great potential to peel off. There's just not enough chipboard for the cover to adhere strongly.

The Problem (aside from messy hot glue!): This is not enough
chipboard on the back to hold for long after the cover is repeatedly
lifted and closed.


I hope my instructions are clear and made sense. In case you'd like a pre-made template for the notepads I made covers for, you can download a PDF file for each size below.

Links will to take you to RapidShare where you can safely download the files for free.
Thanks for stopping by! Leave a comment and I will be sure to check out your blog, too!


Thursday, January 26, 2012

How Time Flies!

My my! It's been too long since I've written! I am working on several projects but have been moving slower than usual on them thanks to some health issues we're still working out. No worries, I'm okay, just had a big problem with fatigue. It's getting better but there are still a few concerns I am investigating. And I'll sure be happy to get to the dentist so my tooth won't hurt anymore -- I might need a third root canal. Sheesh, I have the worst problems with my teeth! Fun (sort of) fact: Over the course of my 25 year old life I have had approximately $15,000 worth of dental work done (a good chunk of that was a set of $4,000 braces).

So this is just a little update post for anyone who doesn't keep up with me elsewhere :)

Saturday, December 24, 2011

Dress Forms, Bookmarks, and Lace!!!

Hey scrappers! Two small projects to share today :)

The first is for a swap on Scrapbook.com. For this one I made corner bookmarks. It was a little challenging embellishing them because in order for them to be practical they can't be too bulky. They definitely can't have dimensional flowers, so I was really out of my element! These would be perfect to embellish with stamped images. I'm still building my stamp collection so I opted for the flower route, but flatter ones. The bookmark itself isn't hard to make, you can follow the written tutorial and watch the video tutorial on Splitcoaststampers.com right here.

Fun fact: since I was out of dimensionals/pop dots, I grabbed three plastic buttons in bright colors (which I never use) for each bookmark and hot glued them to the back of the biggest scalloped oval. Then I hot glued it to the bookmark. I have since gotten myself a package of dimensional adhesive circles from Hobby Lobby :)

Okay, fair warning: If you don't feel like reading from here until the next picture, you're not missing any vital information pertaining to the pictures I wanted to show you all. I for some reason felt like detailing my little trip to Hobby Lobby. All I meant to do was mention that I got a dress form and I ended up writing all this, LOL:

On my way into Hobby Lobby to get dimensionals, I passed all the cool displays they keep at the front with neat stuff. A lot of the time it's 50% off so I make sure I take a peek at it all. If nothing else it's entertaining, there are some cool things on those shelves! But I noticed something on one that I could actually buy without feeling like I wasted my very limited money on something I really didn't need (not that I needed this, either, but you know what I mean...maybe lol). Ever since I saw Jewel from YouTube show a dress form she bought at Ross that she planned on hanging tags from, I've wanted a dress form, too. I've never seen them in stores before (the kind that aren't life-sized, anyway) and didn't have a lot of luck online the first time I searched. Last week I found a few sites I could buy some from but there was other stuff I wanted to spend my money on -- if I had a steady income I'd be fine spending $20+ for a metal/wire dress form, but since I never know what kind of cash I'll have, I kind of have to predict what I might need. I'm sure lots of you do that, too :) So I decided to wait until I had a little more money to get one. But as you can probably guess, I found a perfect one at Hobby Lobby. It's about a foot tall and made from black metal. I think it was made to hang jewelry from, but who knows. Anyway, with great anticipation I stepped up to the display, reached up and flipped the price tag over to see it was only $9.99! And it was on a 50% off display so I happily grabbed one (and I say "grabbed" like it was a simple task...the bottom of the form's three legs curl up- and inward so they were getting caught on everything around the dress form. And a lot of the time the stuff on those displays is fragile or made of glass, so I had to be super careful not to pull anything off. And being short didn't help this process, haha).

So in my basket it went and I made my way to the 50% off ribbon. I had figured out that I couldn't spend more than $20 on this trip, so I took forever to pick anything out! And considering how little ribbon I have at the moment I wanted every color, in every width and every texture. Then there are cute patterned ribbons to choose from! Sheesh. I settled on some sheer metallic gold ribbon (5 yards 5/8"), silver double face satin ribbon (1 spool 5 yards 5/8" and 1 spool 6 yards 1/4"), and a 3 yards of this black ribbon with ruffly edges (5/8") -- there's no description/name on the spool like the others but it does say it's 100% polyester, and after opening it I can tell it won't last me long -- I LOVE it! Each one was $1 on sale. Then I wandered to the next set of shelves and on the other side were laces and trims. Oh my. Glad I didn't see that first or I'd have come home with nothing else but lace! But after spending several minutes picking out four spools of ribbon surrounded by loud squealing and excited kiddos I wasn't going to let that time go to waste by putting it all back in lieu of lace. So I got a big spool of white flat lace (it's about 6 inches wide) for $2 on sale. I like to buy white lace and ribbon so I can Glimmer Mist it whatever color I want for each different project. I didn't realize in the store that I bought silver ribbon, not white. Oh well, it'll do for now :) (Tip: in my experience with misting ribbon you don't get a bright, strong color like with the ribbons you buy already colored, but with lace this works very well!) I was excited to find such wide lace so I can use it with my fabric flowers.

Then I made my way to the scrapbook section and could not for the life of me figure out what to get! I was looking for something to use my 40% off coupon on, and while there was plenty of stuff I'd love to have, I couldn't find anything for $8 that I was willing to spend my little bit of cash on. But if my price limit was $10, I would have had a horrible time deciding what to get. Lots of $10 items I could have gotten. Probably would have picked up an 8x8 pack of awesome paper from DCWV (that may have been $12, I can't remember). So I decided to hold on to my money and let my printed coupon go to waste and left the store with my ribbon and lace, dress form, and dimensionals (on sale for 40$ off! Woot!) for a grand total of $15.24.

On the way home from my doctor's appointment later that afternoon I stopped at Goodwill to see if I could find any more cute shirts or jackets. I accidentally found what is now my favorite shirt there last week, so I'm now hooked on buying clothes there. I love getting like-new clothes for next to nothing! I left with two jackets (one thin denim one and one suede) and a cozy pink 3/4 length sleeve shirt for under $10.

And last night while watching a video from ILuvVintageScrap on YouTube I got linked to The Piece by Piece's Etsy store. After seeing I had more in my PayPal than I thought I had, I decided to buy some trims. I can't wait to get them! I'll be doing a haul video after Christmas and that lace and trim will definitely be a part of it :) I purchased 2 yards of her beige ruffled satin trim, 2 yards of the black ruffled satin trim, 2 yards of the ivory pleated trim, and 2 yards of black venice lace. I made out like a bandit!

Whew, shopping blabbering OVER. Now for the photos of my new dress form and how I decorated it to store some of my lace!


(The red in this is a little desaturated.)

Feel free to comment and I'll be sure to check out your blog :)

Tuesday, December 20, 2011

K is for Cambria

Hey scrappers!

Today I have a small project to share. A friend of mine has an adorable 2 year-old named Cambria and she plans on homeschooling her. She found a really cool idea on Pinterest for their school room: a letter wall. It had all the alphabet with each letter a different size and design. So she got 26 of us to each make a letter however we liked and send it to Cambria for Christmas. I was assigned the letter "K."

I received a plain black metal "K" from a swap awhile ago and decided to use it for this special project.


Since I didn't get a good closeup of the embossing I'll talk about it first. I used a tapestry pattern background stamp (from Stampabilities at Hobby Lobby) and stamped Versamark ink on two parts of the letter. Since the metal held onto oils from my fingers the pattern didn't turn out perfect, but it turned out okay. The gold embossing powder I used took quite a bit longer to melt on the metal than it does on paper! Then to hide the sudden end of the embossing I added leaf trim (from alphastamps.com).


I made this flower using the Tim Holtz Tattered Florals die. The paper is actually from Tim Holtz as well (the pink and blue paper stack). I did quite a bit of glimmer misting and painted the curled up edges with gold paint. I finished it off with some Stickles. Here I decided to take a large floral leaf and set it behind the flower to give it more "whimsy."


This part is simple. I used a piece of Prima bling and flanked it with a pre-made paper flower on the left, and a handmade rosette/blossom on the right. I have a bundle of cool velvet floral leaves so, again for whimsy, I added these behind the flower.

Thanks for stopping by, and leave a comment so I can check out your blog! :)

Thursday, December 15, 2011

Fun Flowers and Sprays!

Hey scrappers! I have a few things I'd love to share with you because they make me happy :)

I've finally accepted that my depression and anxiety disorder are disabilities and finding a job where this disability won't get in the way will be hard. So in the meantime, I've been trying to add more scrappy goodies to my Etsy store for a little income. I have three new items listed that I'm pretty excited about!

Vintage European Lace Flower


I love how simple this flower was to make. It's just strips of lace layered on top of each other! The cream and red laces are vintage from Ireland. Vintage European lace? Yes, please! You can check this out at the store here.

__________________________________________________

Denim, Lace, and Tulle Flower


This creation was pretty time-consuming...I think it took over 2 hours. This is largely due in part to the fact that I lost my $30 scissors and the ones I'm using don't cut denim very well. That part took quite awhile! Oh, before I forget, I need to thank my mom for giving me a pair of her jeans to slice up! Then it was all a game of arranging the denim, lace, and tulle. And it took me quite awhile to decide how many pearls to put in the center. And if I should add feathers and/or a leaf. The decisions we make! But I finally finished this and am very happy with it. It's quite heavy and very fluffy. Check it out on Etsy here.

__________________________________________________ 

Red and Gold Rose Flower Spray
I watched a great tutorial from Psychomoms on YouTube (link to tutorial: here!). So glad I found her channel, I love it. Anyway, this "spray" turned out to be more of a cluster and no, those aren't glue strings you see, they're fibers ;) I promise it's more obvious in person! I made the flower in the middle from Glimmer Misted and painted Tim Holtz paper (the pink and blue paper stack), and the red rosebuds came from the floral section at Hobby Lobby. The little white ribbon rosebuds (look closely) came from the wedding section at Joann's Etc. I've had those for a few years and still have quite a bit left. And if you're looking for a good place to buy very reasonably priced pearl strands like I used in this ($1.99 for 24 yards! Even I can afford that!), check out this awesome site I order from whenever I can: Crafta.com. You can get more details about this spray in my store here.

Leave a comment and I'll be sure to follow your blog :)


Saturday, December 10, 2011

Well hello, scrap world!

Hi friends! So after a year of being out of the scrapping game, I'm back and ready to start creating like a maniac again. Unfortunately I'm having trouble staying focused and awake enough to do a whole lot. I am steadily working on several swaps I'm in on scrapbook.com and can't wait to share all that comes from those projects. Then I think I'll take some time to make a few things for myself, to KEEP, not send away or sell :) I love creating, though, no matter where the creation ends up (unless it's the garbage, that would be no fun :p).

I am currently going through a bit of a rough spot with my depression and anxiety. I have definitely been much worse and am managing to look happy and okay right now, but I am struggling. I blame the lack of daylight -- I have more problems with depression in the winter months than any other time. I will be discussing new treatment options with my psychiatrist on the 22nd. To help me deal with anxiety and some problems that don't make dealing with depression any easier, I am meeting with a Christian counselor/therapist on Monday. They have a sliding scale based on income so my family will be able to afford it if I go weekly. I am looking forward to all this and feeling better. I can't even remember how many times I've had to take a hiatus from school to deal with all this nastiness called depression. But compared to past ordeals, this right now is a cake walk. Doesn't make it easy or not extremely frustrating but at least I can take comfort in the fact that it's not any worse.

I can't wait to get back to writing here, I hope to do it regularly (don't we all say that? LOL) when I have things worthy of sharing. Right now I'm going to try and take a nap (I know, it's 9:30pm, but my sleep cycle/circadian rhythm is so off thanks to my depression "relapse"). Then I hope to really get some scrapping done!

~Katie~