Pages

Thursday, May 24, 2012

Scrapping Pains

So what have I been up to? Scrapping constantly! I have carpal tunnel in both wrists right now, but I can't stop creating, it's such a big part of my life! Thankfully I can work without splints, though I do have to wear them at night or I am in a lot of pain the next day.

So what have I been working on exactly? First I created two custom charms, then made 100 mini ivory envelopes for an Etsy order, did a project for Mother's Day, and am now working on items for an upcoming craft fair I hope to do! I am having a BLAST creating things for the fair!

My favorite thing I've done, though, is this fabric journal I learned to make from my friend Martica here: http://www.youtube.com/watch?v=ZU5jSUfyS-s  I've made four so far of varying sizes and am working on the fifth now (hint: it's denim!). Here are the photos of the projects (minus the envelopes and most of the craft fair items):

My first fabric journal. I made the flower in the center :)

This is my second fabric journal. It measures 3.5x5 inches, and just sold in my shop.

My third and smallest fabric "journal." This one's more like a notepad. It's a keychain measuring 3" square.

My fourth fabric journal and my most eclectic.

Altered Mini Clipboard, soon to be for sale in my Zibbet shop.


This is a charm I made as a gift for my best friend Brandy up in Canadaland :)

Thursday, May 10, 2012

Hard at Work

I've been hard at work creating items for my Zibbet shop. I learned to create paper bag flowers and they are fun and turned out awesome! Here are the ones I created:


I also learned to make beaded daisy sprays on YouTube (link here: http://www.youtube.com/watch?v=Lzg4zTZrhB8&feature=related). It's a great tutorial, and if you try it make sure you use something weaker than 24 gauge wire...my fingers were so sore after I finished this one!

I added velvet leaves and floral tape.

So I got some 28 gauge wire and it's much easier to work with, and I didn't stab myself three times making these two:


I've also been busy uploading new YouTube videos. Check out my channel if you haven't already here: http://www.youtube.com/theElegantCriminal

I am having a giveaway right now, until the 20th of this month, so be sure to check it out!


Monday, April 23, 2012

Consumed: Mini Album and Discovering Scor-Tape

Hi friends! It's about time I wrote, huh?

Well I have actually been consumed with a mini album for Martica's cigar box and mini album swap. Next to my sister's 12x12 wedding scrapbook, my first book ever, this mini album has taken more time than any other project I've ever worked on. And I've been LOVING it! The box is presenting a problem as I lost the hardware to put it back together, but my dad wants me to take him to a cigar shop we used to live close to today so I can get a few new cigar boxes while I'm there. I'm not posting photos or doing a YouTube video of the album until I get the matching box finished, but here is a sneak peek at the album for Victoria.

The true colors are a mystery.... :)


Something else I wanted to blog about is Scor-Tape. I've heard of Scor-Tape for years but never thought much of it since there's always that red line tape that apparently is just as strong. Well, I was getting annoyed at the price and quantity of the red line and similar tapes at Michael's, so I Googled a comparison between Scor-Tape and other advertised super-strong adhesives. When I saw that the rolls have 27 yards of tearable-with-your-fingers tape, I instantly started searching online shops. I purchased a package of 1/4" Scor-Tape from a seller on Amazon and received my tape two days later. I have gone through quite a bit of it! It's strong and I don't have the part of the tape that you pull off to reveal the top sticky layer stuck to me in static cling. That red line tape stuff sticks to you like glue, and that's the part of the adhesive that's NOT adhesive! So I proudly just ordered a 1/2" roll, same thing with the amazing 27 yards of tape, of Scor-Tape so I don't run out of any when this thinner roll inevitably empties. I will try not to cry.


Next post I will show you the photos of the mason jar I altered for A Lil Scrap of Heaven's altered mason jar filled with goodies swap. I have the video on YouTube already so go take a peek if you haven't checked it out yet!

And one more photo, just for the heck of it: I found some old white eyeliner, and haphazardly decided to put it on. I actually did a good job...me, doing well with applying makeup I haven't applied 30 times before! And my pearly whites just got cleaned at the dentist, so I was feelin' pretty good when I snapped this last photo.

Thursday, April 5, 2012

A Few Shabby & Vintage Creations

Two posts in one day! This is only because I've been awake 32 hours (I tried to sleep last night and only got in 2 hours). Gosh darn insomnia! Sure has made me productive last night/today, though!

So in my last post I promised pretty pictures. So those will come first! I might do a separate blog entry for the end of this post I have planned...I guess we'll see!

I have done several projects, some for swaps and some are still in progress, and some (like converting Flat Rate Priority boxes into pretty paper storage) are just for practical purposes.

First thing I'd like to share is my card/mini album fronts. This was a swap hosted by the sweetheart Bonnie on scrapbook.com. I belonged to two categories: Nature and Anything Vintage. First is my design for all three nature cards, and second is a photo of three different card fronts I did for the vintage category.


In the second photo above there are two cards with mini scrolls. I got this idea from Rosanne (roxycar11 on YouTube) and went for the distressed, antiqued look. These are the first four I made and snapped a photo of with Instagram on my phone (who doesn't love that app?!):


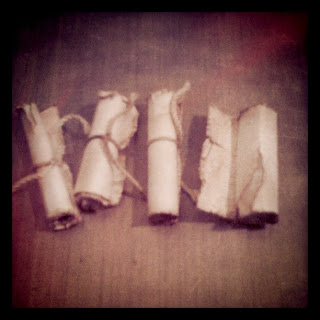
These actually took awhile to make. I just started with a piece of rectangular white cardstock in the height I wanted and aged it with Antique Linen Distress Ink. Next I took my Tim Holtz Distresser tool and tore up the edges of the paper, then inked the edges heavily with Vintage Photo Distress Ink. I rolled them up and used a dab of hot glue to keep them in the right shape while I worked on the string. For the scroll on the far right, I accidentally made a pretty big tear, but I like it! I also used a tiny text stamp from Tim Holtz to add some little text on the exposed part of the scroll (stamped in Vintage Photo). Lastly I cut lengths of white crochet thread and dyed it with Vintage Photo Distress Ink (I dabbed the ink pad onto my non-stick craft mat and sprayed water over it. Then I just swirled the string around in it until it was all dyed. I used a heat tool to speed up the drying process which faded the intensity of the Vintage Photo color). These are just too fun. If you like vintage and distressing, you must try this out! I'd love to see other variations on the scroll idea, so if you have any photos or videos showing your own, please comment!

Alright, the codeine in my system is making me pretty sleepy (I've been tired since 4 am, and it's currently 8:40 pm, but not "sleepy"). Once dinner is eaten I'm going to try and sleep so I can rest up for my drive to the north to sell my pink Cricut Expression. Looks like the other idea I had for the end is going to have to wait for another post :) Happy wishes to you all!

~Katie~

Etsy or Zibbet?: My Take & Opinion

*This first paragraph explains my nightmarish month of March, scrappy-relevant content is below this first paragraph :)*

Hey scrappers! It's been a bit since I've posted! I was already really bad at remembering to update this blog, but I had a horrible month of March -- It goes like this: tooth causing a lot of pain led to a root canal correction. Still lots of pain afterward, got bite adjusted on the temporary crown. Developed an ulcer on the side of my tongue next to the bum tooth and during the root canal/afterwards I bit a huge chunk of my numb tongue off so that hurt pretty bad for a few weeks. During this I run out of Flonase for my allergies and have to wait for it to get delivered from Germany (much cheaper that way) so I am in utter hell with the tongue ulcer and injury and complete nasal and sinus congestion to the point of tears. I sneezed over 100 times daily, easy and close to one box of Kleenex was used each day for nasal "drainage"...nose and skin below my nose gets painfully raw and red. Then ulcer disappears and the tongue pain stops so I stop prescription painkillers. Bad idea. Should have remembered to taper off. Horrible withdrawal week from Vicodin -- severe depression, absolute insomnia the likes of which I didn't know existed, and stomach troubles. Lots of tears were shed that week and it was nothing short of brutal hell.

Good, that's over with!

So since I last posted I have switched my Etsy store over to Zibbet. The costs of listing and selling are much lower on Zibbet considering I have many different items with various quantities. I was going to stop there, but I want to go ahead and tell you why I am loving Zibbet so much more than Etsy (and if my Etsy graphic thing is still in the sidebar ignore it...you can purchase what is in there but that's not where most of the action is!). I think this might be helpful for anyone interested in selling online and are overwhelmed by the options and where to start.

Let's start with what you get with Etsy since it's so popular and it's what I started with in 2009. Several new features have been implemented since then, and I will include them here:
  • - Free to sign up and create a seller's account (PayPal account required)
  • - List unlimited number of items
  • - Each listed item costs $0.20. If you have multiple quantities of the same item in that listing, you are charged $0.20 for each item -- If you have 5 notebooks for sale, your up-front fee is $1.00. You pay this in a monthly bill whether the item sells or not.
  • - Five photo slots
  • - Keywords and tagging for each item
  • - 10 categories in your store for item types
  • - Ability to re-arrange shop (how it appears to customers)
  • - Coupon and 'Free Shipping' Code Capabilities
  • - Each item listed stays visible to buyers for 4 months. After 4 months it is deactivated. You can reactivate it for the original price you paid to list it initially.
  • - Etsy receives 3.5% of what your item(s) sell for, not including the shipping & handling
  • - PayPal takes a 2.9% fee plus $0.30 for each transaction. For example, if you receive $100 from a sale (including shipping), your fee would be $3.20 ($2.90 + $0.30 = $3.20).
  • - Etsy also lets you accept cash, check, or money order. You choose what to accept. Their newest form of payment is allowing customers to pay with credit cards instead of PayPal.
  • - Shipping Profiles

Now let's get to Zibbet. These are the options/benefits of a free account. For a full list see the graphic below. I am currently under the $9.95/month plan.
  • - Free to sign up
  • - List up to 50 items
  • - Four photo slots
  • - Etsy importer (for listings on Etsy you'd like to transfer to Zibbet). This is free, and I just now noticed it!
  • - Unlimited shop sections
  • - Ok to link to other sites from your Zibbet shop (not allowed on Etsy)
  • - No final value fees
  • - Buyers can pay with PayPal or Credit Card
  • - PayPal takes a 2.9% fee plus $0.30 for each transaction. For example, if you receive $100 from a sale (including shipping), your fee would be $3.20 ($2.90 + $0.30 = $3.20).
  • - Shipping Profiles
  • - Discount/coupon/'free shipping' code Capabilities
  • - Keywords and tagging for each item

If having difficulty reading, see it on Zibbet's site here: Zibbet Membership Comparison


I switched to Zibbet mainly because I was sick of all the Etsy fees. When I decided to start selling supplies, I upgraded so I could list multiple quantities of an item (for instance, 3 bundles of lace). I have found that my sale rate is the same on Zibbet so far as it was on Etsy. Zibbet may not be as big as Etsy right now, but it is a large community gaining momentum and more members every day.

I will post again soon with more updates and scrappy goodness, and I promise to have pretty pictures to show next time! In the meantime, check out my shop, Live. Laugh. Scrap. on Zibbet!

~Katie~


Saturday, January 28, 2012

Notepad/Notebook Cover Tutorial

Back in 2010 I came across a great scrapbook website, PapertreyInk.com. While poking around I found these little notepads:

Photo from papertreyink.com | click HERE to view these notepads on their site

These cute notepads are available in white and vintage cream. Now, at the time I hadn't embraced my vintage side, so I ordered a set of the white ones; the vintage ones look lovely and I can't wait to order some. Each set has 10 2.5x8" notepads containing 25 sheets each; I found these nicely priced at $6.

I began working on making covers for these cuties. Here are the four I made with my newfound love, Graphic 45 paper:


I made these for a swap but loved them too much...I decided to list them on Etsy and all but one sold. I came across the last notepad when I moved in October but I sadly have no idea where it is. Ah well, I can and have made more! ;) I ended up creating these notepads for the swap:


The other day I decided to make some more covers so I can list them on my new Etsy site (I moved all my scrappy goodies from Naive Glow Arts to my new shop Live. Laugh. Scrap.). I cannot tell you how fun these are! They don't take long, don't use up a bunch of your stash, and you can get so creative even on a small amount of space. And it's not often we alter/create things in this aspect ratio (12x12 layouts, anyone?), so it stretches your imagination even further. How fun! Here are the two I have made since my return to scrapbooking:

Click here to see this item's listing on Etsy.
Click here to see this item's listing on Zibbet.


Click here to see this item's listing on Etsy.
Click here to see this item's listing on Zibbet.


I realized that I have plenty of notepads of a different size. I stocked up on 3-packs of 5x8" yellow notepads at the Dollar Tree when I anticipated using them in altered file folders for a craft fair. Of course I never did the craft fair so I have at least a dozen altered file folder organizers and a few packs of notepads left over. I figured I would try a cover for one of the 5x8 notepads, and it turned out lovely! I actually stacked two notepads to make it thicker, and that's a great idea for the 25-page mini notepads from Papertrey Ink.

My 5x8" notepad with cover.
Click here to see this notepad's listing on Etsy.
Click here to see this notepad's listing on Zibbet.


I wanted to share how I made the covers and how I decorated them with my YouTube subscribers, so I filmed a simple tutorial giving measurements for the 2.5x8 and 5x8 notepads. Since I tend to get flustered when talking during my videos I wanted to make sure anyone interested in making a cover had easy-to-understand instructions. These are very simple instructions and it didn't take a lot of thought to figure out how to cut and score at what lengths. However sometimes it's nice to have measurements for a project already figured out for you :) Here is the video, and below are the instructions I promised in the video.


For the 2.5x8" notepads:
  • Cut a piece of cardstock or lightweight chipboard to 11x2 5/8"
  • Make your first score line at 8 1/8"
  • Make a second score line at 8 1/4"
  • Bend at the score lines
  • Make sure to leave at least 1-1.5" of chipboard or cardstock above your last score line to adhere to the back of the notepad*
For the 5x8" notepads (2 40-sheet notepads stacked):
  • Cut a piece of cardstock or lightweight chipboard to 11x5 1/8"
  • Make your first score line at 8 1/8"
  • Make a second score line at 8 3/4"
  • Bend at the score lines
  • Make sure to leave at least 1-1.5" of chipboard or cardstock above your last score line to adhere to the back of the notepad*
Customizing the size is very easy, all you need to remember is the following:
  • To figure out the width of your cover, add 1/8" to the width of your notepad
  • Leave the length of the cover at 11 or 12 inches to begin with (depending on the size of your cardstock or chipboard)
  • To figure out the first score line's placement, add 1/8" to the length of your notepad and score at that length
  • Determine the depth of your notepad. That is the distance you need to leave between your first score line and your second.
  • After making your second and final score line, you can trim the length of the cardstock/chipboard to your desired length. Just be sure to leave at least 1-1.5" above the last score line so you can have plenty of cardstock/chipboard to adhere to the back of the notepad*
  • If you are a visual person, these pointers are really easy to understand if you look at one of the PDF templates below.
*Here is what happens if you don't leave much room for the cover to attach to the back of the notepad. Aside from the excess hot glue showing, the problem here is that the cover has the great potential to peel off. There's just not enough chipboard for the cover to adhere strongly.

The Problem (aside from messy hot glue!): This is not enough
chipboard on the back to hold for long after the cover is repeatedly
lifted and closed.


I hope my instructions are clear and made sense. In case you'd like a pre-made template for the notepads I made covers for, you can download a PDF file for each size below.

Links will to take you to RapidShare where you can safely download the files for free.
Thanks for stopping by! Leave a comment and I will be sure to check out your blog, too!


Thursday, January 26, 2012

How Time Flies!

My my! It's been too long since I've written! I am working on several projects but have been moving slower than usual on them thanks to some health issues we're still working out. No worries, I'm okay, just had a big problem with fatigue. It's getting better but there are still a few concerns I am investigating. And I'll sure be happy to get to the dentist so my tooth won't hurt anymore -- I might need a third root canal. Sheesh, I have the worst problems with my teeth! Fun (sort of) fact: Over the course of my 25 year old life I have had approximately $15,000 worth of dental work done (a good chunk of that was a set of $4,000 braces).

So this is just a little update post for anyone who doesn't keep up with me elsewhere :)