Pages

Tuesday, October 30, 2012

Bird Song Bird House

It's been awhile! Seems my posts start like that a lot :) But my family moved to the beautiful mountains in Kentucky and it's taken awhile to get settled. But I have a swap item to share!

Over on scrapbook.com my sweet friend Martica is hosting a swap where we make two items for our secret sister using the Graphic 45 Bird Song paper stack. For my first item I chose to alter a paper mache bird house.

I used a variety of roses to make a flower cluster. I surrounded the base with white venice lace.


I kept the roof fairly simple. I just lined it with white lace, added dangling trim on the bottom edges, and glued three rows of pearls on the top.

Side two.

The peacock is a brooch I bought early this year from SaCrafters on Zibbet.

A closeup of my flower cluster. I love flower clusters!


That's it for now, don't forget to leave a comment, they mean so much to me!

Saturday, September 22, 2012

Adhesive Rundown

Today we're going to talk about ADHESIVE! A staple of scrapbooking, beginners always wonder what adhesives to use. I conducted a poll on scrapbook.com and found that the following were some of the most common used adhesives among the voters:

ATG
Glue Dots
Zig Glue
Glossy Accents
Xyron
Glue Glider Pro

Now, it doesn't take long to figure out that you need several types of adhesive if you're a big paper crafter. I use the following as adhesive:


  • Aleen's Quick Dry or Fast Grab Tacky Glue
  • ATG with non-acid free tape
  • Hot glue
  • Tombow Mono Multi Liquid Glue

I'll tell you what I like (and don't like) about them:

ATG

  • Pros:
    • Cost efficient
    • Good hold for paper
    • No drying time
    • Won't bubble paper
    • Quick application
  • Cons:
    • Big initial investment
    • Takes up a lot of space
Aleen's Quick Dry or Fast Grab Tacky Glue
  • Pros:
    • Dries quickly
    • Cost efficient
    • Strong bond for paper and light embellishments
  • Cons
    • Bubbles under thin paper if applied too thickly
    • Can be messy
Hot Glue
  • Pros:
    • Dries instantly
    • Very strong hold for all craft products
    • Cost efficient
  • Cons:
    • Can be dangerous (burns)
    • Can be messy
    • Requires you to work quickly
    • Bubbles under thin paper
Tombow Mono Multi Liquid Glue
  • Pros:
    • Strong bond for paper and light embellishments
    • Two tips (broad and fine tip) for various adhesive purposes
  • Cons:
    • Gets stuck on your fingers easily, gumming up your project
    • Pricey

One thing I mentioned in each is cost. That's a big factor in what I use. As for a general purpose adhesive, for a beginner I would recommend the ATG over the Glue Glider Pro. The reason? Cost. Here's what I mean:


  • For ATG, after a $32 investment in the gun, which comes with 36 years of adhesive, the refills are only $10 for 36 yards of acid-free adhesive. It's cheaper at $7 if you use non-acid free refills
  • For the Glue Glider Pro, you get a smaller gun that takes up less space. However, after a $15 initial investment that comes with 40 feet of tape, you only get 13.3 yards for $9.
What about small embellishments? Here I would recommend Glue Dots or Glossy Accents. Glue dots come 300 for $4.29 and Glossy Accents is $5.99 for a bottle that lasts a long time (a little goes a long way!).

So what about the Zig 2-way glue? It works great as a re-sticker for Cricut mats, but unless you want a temporary bond for something, it's not the best adhesive.

The Tombow Mono Multi Liquid Glue? It's strong, but it always messes up my project as I can't seem to resist getting my fingers in it and it ruining whatever I'm gluing down. But not everyone has this issue, so on cost alone I will judge it. It's a tad bit expensive. It's $3.39, but the bottle is small and you can go through it quickly if you use it exclusively. It's great for small embellishments, but for paper I would recommend a dry adhesive all the way through.

If you're not picky about acid-free products, I HIGHLY recommend a wet adhesive not found in the scrapbooking section. Some favorites are Aleen's Tacky Glue (I recommend Quick Dry or Fast Grab) and the Fabri-Tac glue. It's cost effective and very, very useful. I have found how to use it to glue down paper without it bubbling (a thin layer, which works very well for a permanent bond). It can be used for paper and other embellishments, which I really like. You can also use it for glitter or flocking powder.


Wednesday, June 27, 2012

I'm A New Demonstrator! "Stamp It Up with Katie"

It's official now: I'm a Stampin' Up! Demonstrator! Woohoo! I visited my upline's home today to talk about becoming a demo and we had a lovely time. Peg is so sweet and she showed me lots of her Stampin' Up stuff, and boy was I impressed! Stamping for me is usually a nightmare -- I suck at it. I now realize it's partially, if not completely, because I have been using inferior products! Their stamps, ink pads, and paper are unsurpassed in quality. I cannot wait to get my starter pack and demonstrate how well I can stamp with their product versus the product I already have on hand.

My Stampin' Up! website is located here: click! I don't have any events or anything planned yet, but once I acquire some more product I will be hosting workshops :)

Wednesday, June 20, 2012

My Method to Madness

A couple of months ago my mom and I were both wanting to read The Hunger Games so bad. When I found it on paperbackswap.com for less than $9 including shipping, we went ahead and ordered it. After it took weeks to arrive, I let my mom have it first. For some reason I haven't been in the mood to sit and read lately. So I got the audio book and am almost done with it. Listening to a book is a great thing to do while I scrap! So if you enjoy audio books, too, you should give it a try if you don't get so distracted with your scrapping that you're not paying attention to the narration. My mind is weird and can focus on both what I'm doing with my hands and the words I'm hearing perfectly. I'm sure lots of people are the same way.

But unless I'm struggling with a project, I don't do a lot of active thinking when I scrap. I think that's why I can listen to the t.v. or an audio book and not miss a word. And yet I get compliments on my work all the time. My dad says I subconsciously just know what looks good and do it without actively thinking it. He analyzes everything I make and tells me what I did right artistically, and I always say, "I just put it together, I didn't think about the red contrast with the rest of the card, honestly." And it goes beyond color combinations which are pretty elementary in the art world as far as finding what looks good together when we're scrapbooking. My dad says the other elements of what I do show, and I have no idea why something looks good, I just keep working until it looks finished. This is what my dad calls my talent. Maybe it is...

Anyway, yesterday this is what I made while I listened to The Hunger Games. All these are for sale in my Zibbet shop (click the long banner to the left!):

Altered wooden trinket box

Another view. The top is padded with batting underneath the satin fabric.

Five petal flowers made with costume satin. For someone who can't sew worth a lick I'm pretty proud ;)
I used the largest circle from the Sizzix Circles #2 die for each petal.

The same as the previous flowers but bigger. I used a glass
bowl as my circle template. I accidentally stained the rim with
Sharpie. Oops!

Well I'm back to listening to my book. I can't write and listen at the same time, that talent is not one I possess :)

Be sure to leave a comment if you stopped by! Thanks for visiting!


Monday, June 18, 2012

Craft Show Preparation!

So I finally got my application mailed off to the Westfield Band Boosters for them to decide on my entry into the craft show. I have no idea how long it will take to get a response back but I am eagerly waiting to hear! If it's a no, I'll be disappointed but there's another fair I can apply to get into. If that's a bust, well let's just say my Zibbet shop is getting a LOT of new inventory! So far these are the types of items I have made (pictures will follow eventually LOL):


  • Skinny Notepads with Covers & Pens
  • Jr. Legal Notepads with Covers & Pens
  • Post-It Note Holders with Pens
  • Altered Composition Notebooks
  • Altered Mini Composition Notebooks
  • Desktop Calendars
  • Altered Mini Clipboard Organizers
  • Teacher Gifts
  • Kids' "What I did each day for a week" Journals
  • 2-5-7-10 Gift Bags
  • Bag-in-a-Boxes (like gift bags)
  • Regular Clipboard Organizers
  • Christmas Card Sets with Boxes and Envelopes
  • Greeting Cards
  • Gift Card Holders
  • Lip Gloss Holders
  • Floral Hair Clips
  • Clear Stone Refrigerator Magnets
  • File Folder Organizers
  • Homemade Dog Treats in Origami Boxes
My mom is also helping me with some mason jar decorations. They're filled with epsom salts and have a tea light candle in the middle. We're going to wrap wide lace or ribbons/bows around the jars. I also plan on making some treat items, like Snowman Soup or Reindeer Food. I'm saving the food stuff for closer to the November show date.

This upcoming weekend is the Fishers Freedom Festival, a huge festival in the town I grew up in. They have lots of vendors selling various items so my mom and I are going to go check out the prices and types of items people are selling. It'll also give me a chance to ask some questions of the veteran vendors!

Saturday, June 16, 2012

Obsessions

I have a new obsession. And surprisingly, it's not scrappy! It's yogurt mixed with Special K Low Fat Granola cereal. Oh my goodness I am averaging 3 cups a day! Mixing the cereal with the $0.39 yogurt from Aldi is a lot cheaper than buying the yogurt that comes with granola in the top part of the cap. And it's low-fat granola with low-fat yogurt so it's pretty healthy. My favorite flavor is strawberry banana, but I like strawberry and vanilla, too.

My latest scrapbooking obsession is washi tape. Washi tape looks a lot like ribbon, and I love that it's self-adhesive and I can get more yardage at a better price than ribbon. Of course I can't tie bows with washi tape, but when I need ribbon to just line across a page or project, washi tape is a great alternative! A good place to get washi tape is from an Etsy shop run by an affluent YouTuber named Drew. The link is right here: http://discountcharms.etsy.com. I only have two rolls but am already HOOKED! So check out washi tape, you might get hooked, too!

Friday, June 15, 2012

"Cotton Candy" Paper Carnation Flower Tutorial

Hi scrappers! I have a flower tutorial for you today -- cotton candy carnations! My mom thought the pastel ones I made here looked like cotton candy, so I decided to keep that name :)


This is a really easy flower to make and doesn't take a whole lot of skill. So let's get started!

What you will need:

  • Cardstock
  • Water in a spray bottle
  • Paper piercer/small hole punch
  • Brad
  • Scallop circle punch
First, cut out 8 scallop circles with your punch. Ink the edges if desired.


Next, lightly spritz all eight circles with water. Do not fully saturate the circles. If you are using thinner paper, you will need very little water.


Now take each circle and crumple it up into a little ball.


Carefully un-crumple all the circles. They are wet so they will tear if you are not careful. You should have eight damp wrinkly scallop circles now.


This step is optional. If you are impatient like me, you can use a heat tool to dry the circles.


Now, stack one circle on top of the other until all circles have been stacked. Find the center of the top circle and pierce/punch a small hole through all eight layers.


Next put your brad through the hole and fasten it to the bottom of the stack.


This is the most time-consuming part. Separate the top layer and pretend there is a pencil sticking through the center of the stack and wrap the layer around the "invisible pencil." Really crumple it tightly!


Continue doing the same thing with the remaining 7 layers.


Now gently use the tips of your fingers to fan out the different layers gently until you get the fluffy appearance, or whatever shape you prefer.


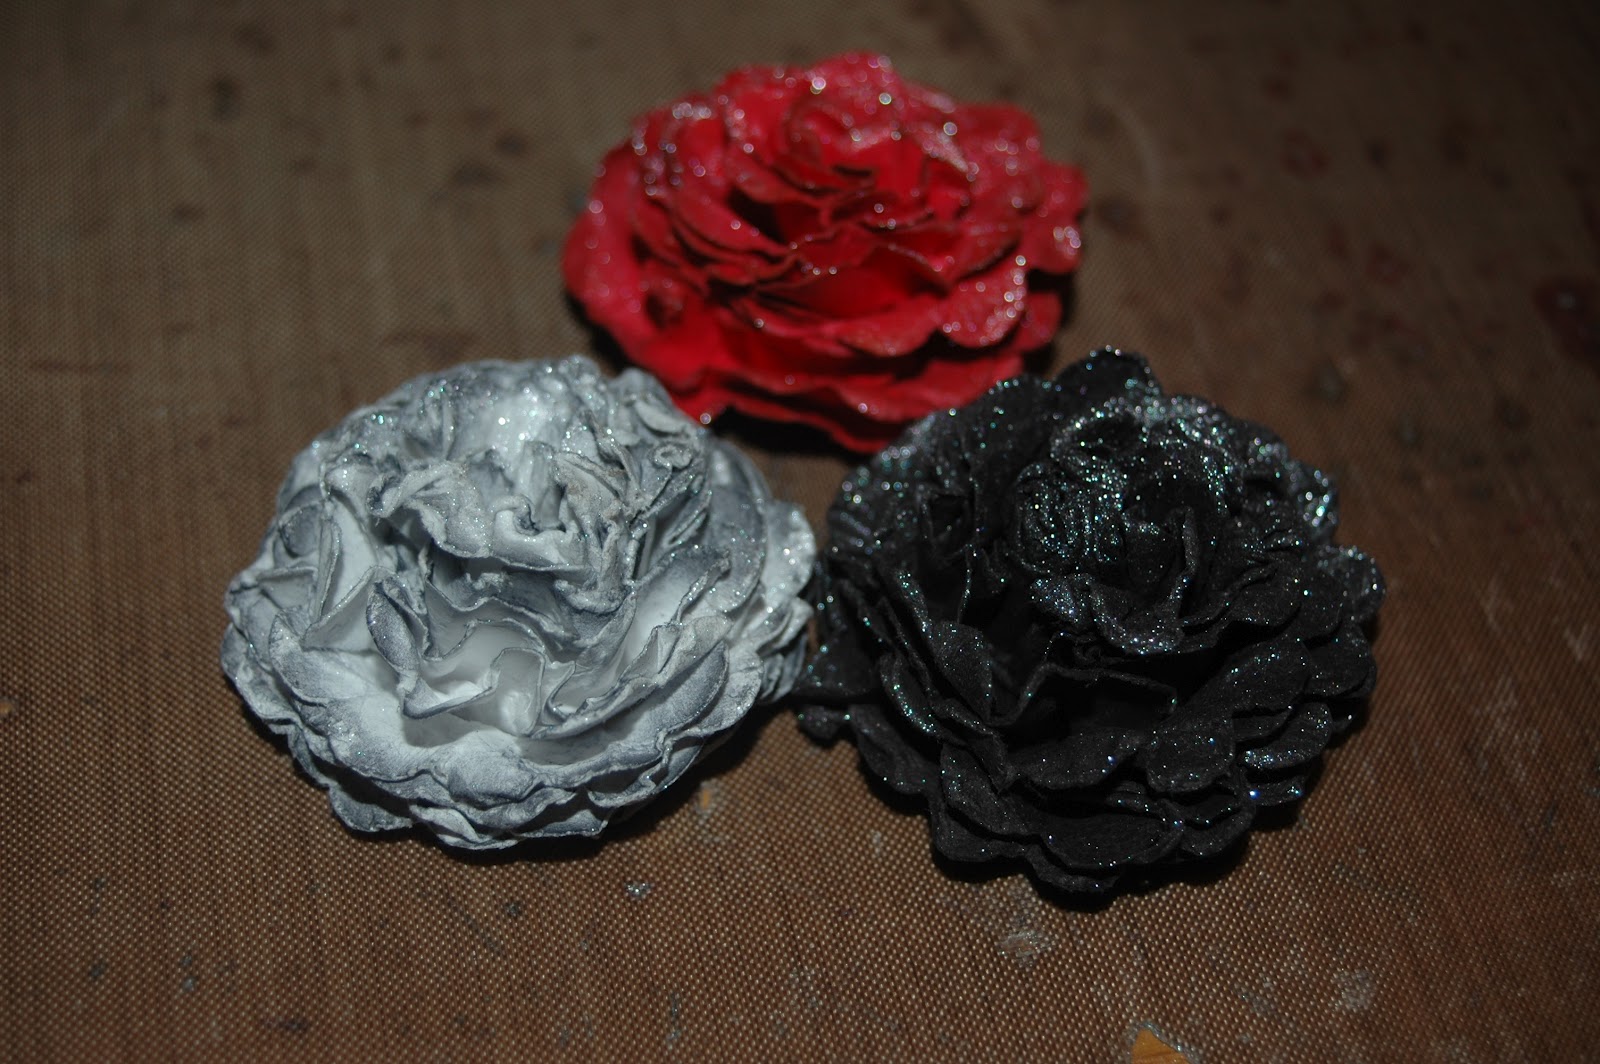
And here you have your finished carnation! Another optional step is to Glimmer Mist (or any shimmer spray you like to use) the carnation (second photo -- the Glimmer Mist looks overkill thanks to the bright flash on my camera!).


I hope you enjoyed this tutorial and found it easy to understand! I have a video tutorial on my YouTube channel located at http://www.youtube.com/theElegantCriminal


I have this type of flower available in my Zibbet shop located here: http://www.zibbet.com/kinetickatie

Thanks for stopping by, don't forget to leave a comment! :)

Thursday, June 7, 2012

My First Layouts Since My Scrapping Return!

So I finally got into making layouts again! I have only made one double layout since I got back into scrapping, and that was for someone else in a swap. But I've made four in the last week or so, and it feels so good! Ready to see them? Let's go!

The first layout was inspired by Lisa over at What a Beautiful Mess. I lifted her layout featuring the faux envelope she did a great tutorial on. She also has a tutorial on faux scrabble letters, which I used for the title. She graciously let me do a video version of the tutorial which you can find on my YouTube channel (link in the sidebar).

I live in the Indianapolis suburbs and this year the Super Bowl was here in Indy! So the Friday before the game two friends and I went downtown to enjoy the festivities going on. We had a lot of fun! My favorite thing was the roman numerals, XLVI, in Monument Circle. They were HUGE and acted as a projection screen for videos. It was so cool!


Flower on left made by me, flowers on right from IAmRoses.com. That's me standing in front of the numerals.

I used Lisa's faux scrabble technique for the title. I also added some eyelets, which I've never done on a layout before! Love my Crop a Dile Big Bite :)

This is the faux envelope I learned to make from Lisa's tutorial.

I colored the top rose from I Am Roses. As you can tell it was white :) I painted it with Brick Glimmer Mist.

I made this flower with Tim Holtz's Tattered Florals die. It's made up of costume satin, lace, and tulle. And a giant button :)

"Agape" here is pronounced "uh-GAH-pay" and it's a Greek word meaning the highest form of love. It's the type of love between families, and the type of love God has for us. The picture is hard to see, but I've looked at it so many times it didn't really matter if it was real clear. I remember that moment clearly and I think I always will. My dad had been in the hospital for a week, then was transferred to an inpatient physical rehab center for almost three weeks. He had gained 40 pounds in pure water weight from a change in meds and he was bloated to the max, barely able to move, water literally seeping through his skin. But despite his uncomfortable condition, he was so excited to have my brother and me visit him. I asked my brother to take a picture of us and when I walked over to lean down, my dad grabbed my arm and held on with his hand and kept me close as he smiled widely. He was truly happy, and it was just because we were there.

I have brown and "rockstar red" hair at the moment :) The tips are all red and I have several streaks throughout my hair as well. I LOVE it! When I got back from the salon I took a bunch of pics with my computer's webcam photo program, Photobooth, to try and get a good picture of me with the new hair. I kept all the ones I didn't upload to Facebook and I ended up using them on this layout! I made each flower on this layout. The title is "My Version of a Dye It." :)

One night, just before Christmas, I noticed someone forgot to turn off the lights on the Christmas tree in our dining room. I decided to take some pictures of various ornaments. The only ornament that isn't sentimental is the ballerina, I'm not sure when we got that one, but I thought it was pretty and cute and decided to use it in my photographic experiment. I wasn't sure if the photos would turn out or not, but I was able to edit them in Photoshop and I love how they turned out!

This is a flower I made with Tim Holtz' Film Strip Ribbon and Canvas Ruler Ribbon. I used red beaded floral spray and two large floral leaves to accent it. A ribbon rose I bought at Michael's sits in the  center (I wish I could get the hang of making those myself!)

Again I used Lisa's faux Scrabble letter technique for the title. I'm low on Thickers and letters so  I've been using these a lot! :)
I hope you enjoyed looking the layouts, leave a comment if you stopped by! <3

Friday, June 1, 2012

Charm Tutorial: Part One -- Supplies

I am going ahead with the charm tutorial! I got a huge response on YouTube from viewers saying they'd love to learn how to make them, so I am going to do a series on how to make them beautifully! For the first video, I describe the supplies you need. Here is a written list of what you need:


  • Jewelry-sized Flat Nose Pliers (two pair is helpful, but only one is necessary)
Photo from FireMountainGems.com    
  • Jewelry-sized Round Nose Pliers
Photo from FireMountainGems.com
      
  • Head Pins
Photo from FireMountainGems.com
      
  • Eye Pins
Photo from FireMountainGems.com
      
  • Jump Rings (be sure NOT to get double o-rings!)
Photo from FireMountainGems.com
      
  • Variety of Beads (don't forget pearls if you like)
  • Bead Caps (optional)
Photo from FireMountainGems.com
      
  • Wire Cutters (can be full-sized, does not need to be made for jewelry-making)
Your wire cutters may look a bit different. Photo from FireMountainGems.com
      
  • Chain and Closure (try Tim Holtz's Swivel Clasps)
Photo from SimonSaysStamp.com
      
  • Charms
Here is the video from my YouTube channel:


Let me know if you have any questions in the comments section!

Tuesday, May 29, 2012

(Literal) Scrapping Pains!

A few posts ago I titled my post "Scrapping Pains." Well, there's more.

What has scrapping done to me? Carpal tunnel in my wrists and now I have to wear Ace bandages around my ankles to protect the skin. I sit with my legs crossed over each other (when I was little we called sitting like this "Indian style") in my big leather desk chair, and you can see on the leather where the finish has rubbed off and is discolored from my ankles resting there. I will spare you the photos of what they look like. When I stand up from scrapping, my mom will gasp if she sees the outside of my ankles and feet because it looks like they've been burned severely. It finally started getting painful so I am now wearing bandages to protect the skin on my ankles. I feel like an athlete...an athlete who sits and creates :)

These are the braces I wear when I sleep to keep my wrists straight and the median nerves unrestricted (this is a reversed photo, like looking in a mirror...the hand on the left is really my left hand, not my right):


And here are the bandages on my ankles:


There must be a name for this...oh, right, it's called being an obsessed scrapper! :)

Monday, May 28, 2012

What's New?

Hi friends! So I finally finished all the calendars I had in mind. These are mini calendars that are perfect for a number of projects. I have one set for 2012, a fill-in calendar that I can send you for free (just comment with your e-mail), and a set for 2013. Go to my Zibbet shop at www.zibbet.com/kinetickatie to check them out! The pre-numbered calendars are $3 each.

I'm also running a special in my shop: until I raise $20, the minimum donation to the ASPCA, 20% of every order before taxes and shipping will go towards that $20 donation. According to the ASPCA, $20 will feed a homeless dog or cat for three weeks! I am super excited about donating to the ASPCA, I really wish I had the financial means to be part of their monthly donation club.

In my last post I mentioned some charms I made for some friends, one a loyal customer at my shop. Here are the turquoise charms I made for them:

This one was made for a client.

This one, with the daisy charms, was made for a high school/church friend's wife.

If you want to learn to make charms of your own, comment so I can see what kind of demand there is for a video tutorial :)

Thursday, May 24, 2012

Scrapping Pains

So what have I been up to? Scrapping constantly! I have carpal tunnel in both wrists right now, but I can't stop creating, it's such a big part of my life! Thankfully I can work without splints, though I do have to wear them at night or I am in a lot of pain the next day.

So what have I been working on exactly? First I created two custom charms, then made 100 mini ivory envelopes for an Etsy order, did a project for Mother's Day, and am now working on items for an upcoming craft fair I hope to do! I am having a BLAST creating things for the fair!

My favorite thing I've done, though, is this fabric journal I learned to make from my friend Martica here: http://www.youtube.com/watch?v=ZU5jSUfyS-s  I've made four so far of varying sizes and am working on the fifth now (hint: it's denim!). Here are the photos of the projects (minus the envelopes and most of the craft fair items):

My first fabric journal. I made the flower in the center :)

This is my second fabric journal. It measures 3.5x5 inches, and just sold in my shop.

My third and smallest fabric "journal." This one's more like a notepad. It's a keychain measuring 3" square.

My fourth fabric journal and my most eclectic.

Altered Mini Clipboard, soon to be for sale in my Zibbet shop.


This is a charm I made as a gift for my best friend Brandy up in Canadaland :)